Key takeaways
- Check the connection: Inspect the D-loop and release jaw or hook for wear, damage, and correct engagement before shooting.
- Keep the mechanism clean: Wipe off dirt and moisture after use. Avoid soaking the release or applying household oil; use only care products and methods approved by its manufacturer.
- Inspect wear points: Look for fraying or damaged stitching on wrist straps, loosened fasteners, sticky triggers, and visible wear on jaws or hooks.
- Practice with the exact setup: A new strap length, grip, or trigger setting changes how the release feels. Make changes gradually and practice in a safe range with the bow pointed toward a proper target.
- Retire damaged gear: A release is a load-bearing part of the shooting system. Do not keep using one with a damaged strap, questionable hook, or malfunctioning mechanism; have it inspected or replace it.
Best archery release aids: the quick answer
The best archery release aid depends on how you want the shot to fire: choose a wrist-strap index release for a familiar, easy-to-learn trigger; a thumb button for precise, repeatable hand placement; or a hinge for a triggerless release that rewards careful practice. Fit and adjustment matter as much as release style—an aid that is too short, too loud, or poorly set up can undermine consistency.
For most new compound-bow shooters, a well-fitted wrist release is the simplest starting point. Experienced archers seeking more control over their hand position often prefer a thumb release. Hinge releases suit archers willing to learn a rotation-based firing method and follow safe practice routines.
Our top picks
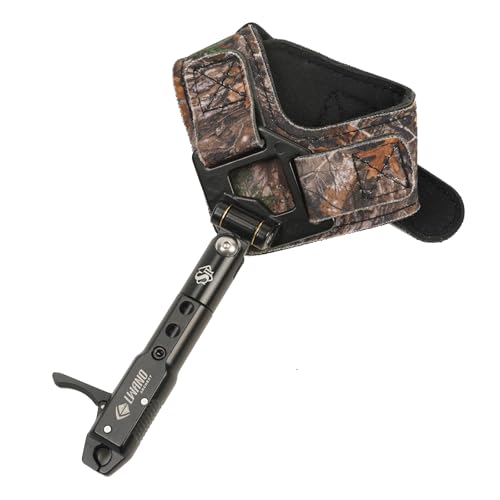


As an Amazon Associate we earn from qualifying purchases at no extra cost to you. Ratings are shown as listed on Amazon.
Wrist vs. thumb vs. hinge
| Release type | How it fires | Trigger control and adjustment | Fit and noise considerations | Good match for |
|---|---|---|---|---|
| Wrist strap, index finger | Finger presses a trigger; strap connects the release to the wrist. | Usually the most intuitive trigger. Models may offer trigger-travel or tension adjustment; check the specific model. | Strap length and buckle or hook position affect draw length and hand alignment. Metal jaws can click against the D-loop if allowed to hang loose. | Beginners, hunters who want the release attached to the wrist, and archers who prefer a familiar trigger. |
| Handheld, thumb button | Thumb presses a button to open the jaw or activate the mechanism. | Button position and trigger sensitivity vary. Some models allow adjustment; the exact range is model-specific. | Requires a comfortable hand fit and a repeatable grip. Keep the head from knocking against the bow or D-loop. | Archers who want a compact handheld aid and consistent hand placement. |
| Handheld, hinge | Rotation of the handle operates the mechanism; there is no conventional trigger button. | Release timing depends on the archer’s controlled rotation. Some models offer adjustable safety or click mechanisms; learn the setup before shooting. | Hand size and finger placement affect leverage. A hinge may click if its head contacts other hardware. | Experienced archers prepared to practice a different release process under safe supervision. |
There is no universal weight or adjustment range for each category: dimensions, materials, and settings differ by model. Treat the table as a style comparison, not a substitute for checking a manufacturer’s specifications. In particular, never assume that a safety, click, or trigger adjustment works the same way across brands.
Pick by your shooting situation
| Your situation | Most practical starting point | Why |
|---|---|---|
| New to compound archery | Wrist-strap index release | Simple operation and a strap that keeps the aid attached make it easier to learn basic setup and shot routine. |
| Hunting, with quiet handling a priority | Whichever type fits securely and can be kept from rattling | Noise often comes from loose metal parts contacting the bow, D-loop, or other gear—not the category alone. |
| Target practice and repeatable hand placement | Thumb release, if it fits your hand | A handheld grip can make finger and hand positioning repeatable, but takes practice to operate consistently. |
| Looking for a triggerless method | Hinge, with instruction and a safe practice plan | It uses rotation rather than a button press, so the learning curve and safety considerations are different. |
| Limited budget | A basic, adjustable wrist release that fits | Entry-level models are commonly less expensive than many premium handheld options. Compare current local prices and replacement-part availability. |
What to check before buying
Trigger control and adjustment
With an index release, look for a trigger that feels predictable and can be set without accidental activation. Thumb releases vary in button shape, position, and sensitivity; a button that is adjustable is not automatically better if it is set too light for your experience. Hinge releases are not “set and forget”: safety features and timing mechanisms, where present, need to be understood and configured according to the manufacturer’s instructions.
Make one adjustment at a time, and follow the maker’s guidance. If a release behaves unexpectedly, stop using it until you understand the cause. Do not test a newly adjusted aid by drawing toward yourself or another person.
Fit, length, and hand position
A wrist strap should hold securely without pinching. Its connection length changes where the release sits relative to your hand, so a different setting can affect how you reach the bowstring and anchor. Handheld aids should sit naturally in your fingers without forcing an awkward grip. When possible, handle the release before purchase or ask a qualified archery pro shop to check fit and compatibility with your bow’s D-loop.
Noise and hunting readiness
Quiet handling depends on the whole setup. A loose jaw or head can tap the D-loop; a wrist release hanging from its strap can bump the bow; and a metal buckle can rattle against other equipment. Check for contact points while the bow is undrawn, secure the aid when moving, and use only manufacturer-approved steps to reduce noise. Do not add tape, padding, or lubricant where it could interfere with the mechanism.
Setup and care that help the release last
- Check the connection: Inspect the D-loop and release jaw or hook for wear, damage, and correct engagement before shooting.
- Keep the mechanism clean: Wipe off dirt and moisture after use. Avoid soaking the release or applying household oil; use only care products and methods approved by its manufacturer.
- Inspect wear points: Look for fraying or damaged stitching on wrist straps, loosened fasteners, sticky triggers, and visible wear on jaws or hooks.
- Practice with the exact setup: A new strap length, grip, or trigger setting changes how the release feels. Make changes gradually and practice in a safe range with the bow pointed toward a proper target.
- Retire damaged gear: A release is a load-bearing part of the shooting system. Do not keep using one with a damaged strap, questionable hook, or malfunctioning mechanism; have it inspected or replace it.
On wrist releases, strap material, stitching, and buckle or connection hardware are common places to inspect. On handheld aids, moving parts and the jaw or hook deserve attention. Dirt, corrosion, impacts, and unauthorized adjustments can shorten service life. Check the manufacturer’s maintenance schedule and replace worn components rather than relying on appearance alone.
Bottom line
Choose a wrist release if you want an accessible, attached aid; a thumb release if a handheld grip and repeatable button placement suit you; or a hinge if you are experienced or prepared to learn its rotation-based method carefully. Before buying, prioritize a secure fit, a predictable mechanism, compatible D-loop engagement, and quiet carry. If you are new to releases—especially hinges—ask a qualified archery instructor or pro shop to help with setup and safe practice.