
Key takeaways
- Occasional home cooking: A manual pull-through sharpener plus a fine ceramic rod is inexpensive and compact. Use the sharpener only when the rod no longer restores cutting performance.
- Daily cooking: A 1,000/4,000-grit whetstone provides better long-term control, while a rod handles quick maintenance between full sharpening sessions.
- Several knives and multiple users: An electric sharpener reduces variation between users. Choose one with separate angle stages and clear instructions rather than the fastest motor.
- Premium or thin Japanese knives: Prefer a whetstone or a purpose-designed guided system. Confirm the supported angle and avoid generic carbide slots.
- Very limited storage: A pull-through tool takes the least space. A rod is also narrow, but it still needs a safe location where its tip will not be damaged.
The best knife sharpeners for kitchen use depend on how much edge control you want: choose a whetstone for the sharpest, most adjustable result, a pull-through sharpener for speed and simplicity, a honing rod for routine edge alignment, or an electric model when convenience matters more than fine control.
Our top picks



As an Amazon Associate we earn from qualifying purchases at no extra cost to you. Ratings are shown as listed on Amazon.
Quick picks by kitchen situation
| Kitchen situation | Best choice | Why it fits | Typical cost |
|---|---|---|---|
| You want maximum control and already enjoy learning techniques | Two-sided whetstone | Adjustable angle, grit, pressure, and material removal | $25–$100 |
| You need a working edge in under a minute | Manual pull-through sharpener | Guided slots reduce technique requirements | $15–$60 |
| Your knife is used often but is only slightly dull | Honing rod | Realigns a rolled edge without substantial sharpening | $15–$80 |
| Several household users need predictable results | Electric sharpener | Motorized abrasive wheels maintain a consistent angle | $70–$250 |
| You have limited drawer or counter space | Compact pull-through sharpener | Small footprint and no soaking or mounting setup | $15–$40 |
What each type actually does
Whetstones: the most control, the steepest learning curve
A whetstone, also called a water stone or sharpening stone, lets you choose the sharpening angle and remove metal gradually. It is the strongest option when you care about edge geometry, want to sharpen unusual blades, or need to repair a noticeably dull edge.
For general kitchen knives, a combination stone with approximately 800 or 1,000 grit on one side and 3,000 to 6,000 grit on the other is a practical starting point. Coarser stones around 200 to 400 grit are useful for chips and major repairs, but they remove metal quickly and are easy to misuse. Very high grits above 8,000 produce polished edges, though that extra refinement is not essential for most food preparation.
The trade-off is technique. You must hold the blade at a repeatable angle, use appropriate pressure, sharpen both sides evenly, and raise and remove a burr. Many Western-style kitchen knives work well around 15 to 20 degrees per side; the manufacturer’s guidance takes priority, particularly for thin Japanese knives.
Pull-through sharpeners: fast and accessible
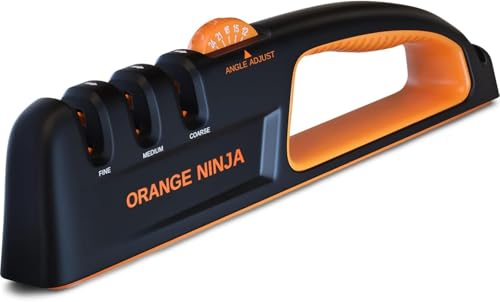
Manual pull-through models use carbide, ceramic, or diamond abrasives in fixed-angle slots. A coarse slot restores a blunt edge, while a fine ceramic slot refines it. Some models include a separate slot for serrated knives, although not every serration design is compatible.
The principal advantage is repeatability for beginners. The guide controls the blade angle, and sharpening usually takes five to ten strokes per stage. The disadvantage is limited control: the abrasive may remove more steel than necessary, and the preset angle may not match the knife’s original geometry. Avoid applying downward force. Let the abrasive work while keeping the knife vertical.
Pull-through sharpeners are particularly useful for inexpensive, conventional stainless-steel knives. They are less suitable for very thin, single-bevel, heavily curved, or valuable blades unless the manufacturer specifically supports them.
Honing rods: maintenance, not a complete sharpening system
A honing rod is often misunderstood. A smooth or fine ceramic rod primarily realigns a slightly displaced edge; it does not replace significant amounts of missing metal. A traditional grooved steel rod can be useful on tougher European-style knives, but it may be too aggressive for delicate edges.
Use a rod when the knife still cuts reasonably well but feels less precise after repeated use. If it slides across a tomato skin or crushes food rather than entering cleanly, the edge may need actual sharpening. Ceramic rods are harder and can provide a finer maintenance surface, but they are brittle and can chip if dropped.
Electric sharpeners: consistent results with less practice
Electric sharpeners use motor-driven abrasive discs or belts, normally arranged in coarse and fine stages. Some include a polishing stage or a separate guide for Asian-style edge angles. They are convenient for busy kitchens and households where several people sharpen knives with different levels of skill.
They occupy more counter or cupboard space, make more noise, and generally cost more than manual tools. They also remove metal quickly. Pulling the blade too slowly, pressing down, or making too many passes can shorten the knife’s useful life. Look for models with distinct stages, stable non-slip feet, replaceable abrasive assemblies, and angle guidance suited to your knives.
Head-to-head comparison: control, grit, and space
| Sharpener type | Typical abrasive or grit | Angle control | Typical setup time | Approximate footprint | Metal removal |
|---|---|---|---|---|---|
| Whetstone | 200–8,000+ grit; common starter pair 1,000/4,000 | High, but user-controlled | 5–15 minutes, including soaking or wetting | 18–25 cm long, usually 5–8 cm wide | Very low to high, depending on grit and pressure |
| Manual pull-through | Coarse carbide or diamond; fine ceramic | Low user control; fixed guide | 1–3 minutes | 10–20 cm long | Moderate to high |
| Honing rod | Steel, ceramic, or diamond surface; grit often unlisted | Medium to high, depending on technique | Less than 1 minute | 25–35 cm long, narrow storage | Low for smooth steel; moderate for ceramic or diamond |
| Electric sharpener | Motorized diamond or ceramic abrasives; often 2–3 stages | Moderate; guide controls the angle | 1–3 minutes | 20–30 cm long and 8–15 cm deep | Moderate to high |
How to choose by frequency and budget
- Occasional home cooking: A manual pull-through sharpener plus a fine ceramic rod is inexpensive and compact. Use the sharpener only when the rod no longer restores cutting performance.
- Daily cooking: A 1,000/4,000-grit whetstone provides better long-term control, while a rod handles quick maintenance between full sharpening sessions.
- Several knives and multiple users: An electric sharpener reduces variation between users. Choose one with separate angle stages and clear instructions rather than the fastest motor.
- Premium or thin Japanese knives: Prefer a whetstone or a purpose-designed guided system. Confirm the supported angle and avoid generic carbide slots.
- Very limited storage: A pull-through tool takes the least space. A rod is also narrow, but it still needs a safe location where its tip will not be damaged.
A practical whetstone setup
For a first setup, use a combination stone around 1,000/4,000 grit, a non-slip base, a water container if the stone requires soaking, and a flattening plate or abrasive flattening sheet. A typical session follows these steps:
- Prepare the stone. Wet or soak it according to its instructions. Place it securely so it cannot slide.
- Mark the bevel. A washable marker along the existing bevel shows whether your angle is contacting the correct area.
- Sharpen the coarse side. Use light, even strokes from heel to tip. Continue until a small burr can be felt along the opposite side.
- Repeat on the other side. Match the number of strokes and pressure as closely as possible.
- Refine on the finer side. Use lighter pressure and fewer passes. Finish with alternating strokes to reduce the burr.
- Clean and dry the knife. Rinse away abrasive residue, dry the blade, and wipe the stone clean.
Flatten the stone when its center becomes visibly hollow or sharpening begins to feel inconsistent. A dished stone changes the angle and can prevent the edge from contacting the abrasive evenly.
Ownership costs and durability
The abrasive surface is the component that wears first. Whetstones gradually hollow and require flattening; pull-through inserts eventually lose cutting ability; electric models need replacement discs, belts, or cartridges; and ceramic rods can fracture from impact. A low purchase price does not always mean the lowest cost per use.
For example, suppose a $40 manual sharpener remains effective for 200 sharpening sessions. Its abrasive cost is about 20 cents per session before replacement. A $120 electric sharpener used for 300 sessions costs about 40 cents per session, excluding replacement parts and electricity. The electric model may still be the better value if it saves several minutes each time or prevents inconsistent sharpening across a busy household.
Never put a whetstone, rod, or manual sharpener in a dishwasher unless its instructions explicitly permit it. Remove loose filings with a damp cloth, keep abrasive surfaces free of food residue, and store stones completely dry after cleaning to reduce odor, cracking, or mold. Do not sharpen knives on glass cutting boards or use a sharpening tool as a substitute for safe cutting technique.
Common buying mistakes
- Buying a very coarse abrasive for routine maintenance and removing unnecessary steel.
- Assuming a honing rod will restore a completely blunt edge.
- Choosing a fixed-angle sharpener without checking the knife’s intended bevel angle.
- Ignoring serrated knives, which normally need a tapered ceramic rod or a compatible specialized tool.
- Prioritizing maximum grit over edge durability; a highly polished edge is not automatically the most useful edge for everyday chopping.
- Skipping stability features such as a non-slip base, wide handle, or secure mounting surface.
Final buying recommendation
For most households, the best balance is a 1,000/4,000-grit whetstone if someone is willing to learn, or a compact two-stage pull-through sharpener if speed matters more. Add a honing rod for frequent maintenance, not as the only tool. Choose an electric model when consistent operation by several users justifies its greater cost, noise, counter space, and faster metal removal. The right sharpener is the one whose angle control, abrasive aggressiveness, and maintenance demands match how your kitchen actually uses knives.


